In this simple guide, I will teach you step by step how to create a website without writing a single line of code. Developing a website is not a rocket science. With advanced drag and drop site builders like elementor, divi etc, you can easily develop a professional website for yourself.
One Important Thing Before We Start.
We have several websites building platforms in the world. We have like wordpress, Wix, Drupal, Joomla, Weebly etc. and many more.
Back in the days, the only way to build a website is to code it from scratch using programming languages like Html, CSS, JavaScript, PHP and the list continues.
But now it can be a waste of time coding your website from scratch unless you are building a specific website which you cannot build with WordPress or other Content Management Systems (CMS). The only problem with coding it from scratch is that, it does take a lot of time to complete.
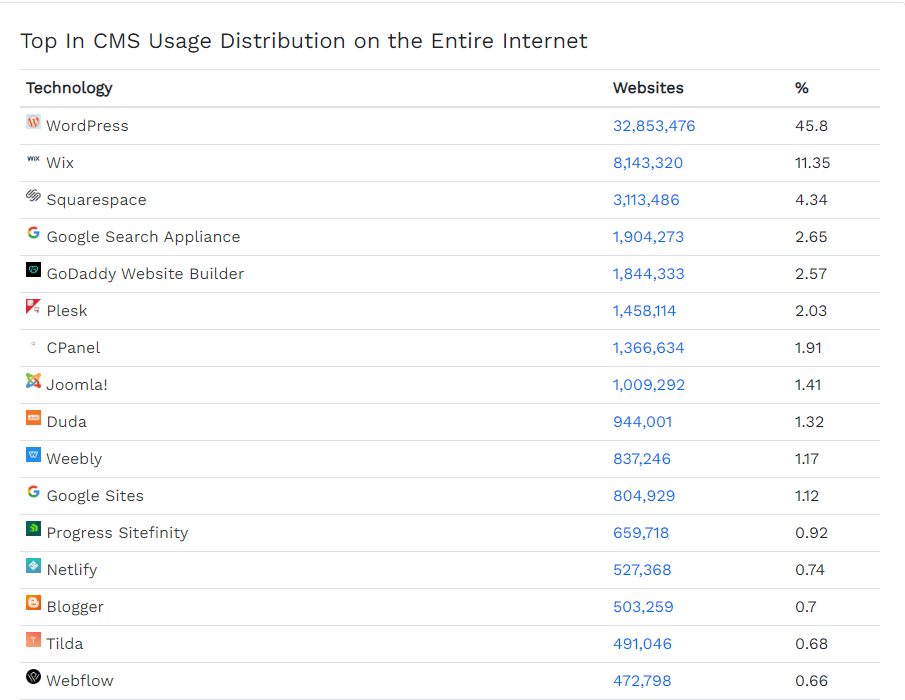
Small Statistics About Content Management System [CMS]
Source: https://trends.builtwith.com/cms/traffic/Entire-Internet
Most websites builders in 2019
- WordPress – 45.8%
- Wix – 11.35%
- Squarespace- 4.34%
- Google search appliance – 2.65%
- Godaddy website builder – 2.57%
Reasons Why People Use WordPress
When we come to website design/creation, WordPress is the easiest platform that you can work with. This is because:
- It is easy and flexible to use.
- It is beginner friendly and anyone can use it without any hindrances once you follow the steps.
- Another most important aspect of WordPress is, it’s free of charge.
- You don’t need to pay a fee before you can start using it unlike other websites builders like wix, weebly, etc.
Read Also : How To Make Money On Clickbank
Now let’s get down to the business.
Step 1 : Get Web Hosting And Domain Name
There are mainly two things that you need in other to set up a website.
- Domain ( Is the name of your website like yoursitename.com )
- Web Hosting ( This is a service which stores your website files and documents and also make it visible on the internet.)
In other to have a full functioning websites, you need the above two Features . You need to have a domain name which will correspond with your business name and the hosting which will host your site files, documents, images etc and also make it available on the internet.
How To Register A Web Hosting and Domain Name?
The best and the most popular domain registrar and a web hosting company is Bluehost. We use it most times to build our website and clients website and the results are crazily amazing. Use our special link here to get a free domain name for 1 full year with any of the hosting plans.
Bluehost hosting plans start at as low as $3.95/month with amazing features which you cannot get at some other hosting companies with premium plans.
Bluehost is very secure, user friendly and one of the fastest web hosting companies which will do the job for you. So it’s worth checking them out.

1. Visit Bluehost.com
NB: Since we have special partnership with Bluehost, there is a special discount available for softechreview.com visitors.
Use this link to activate the discount.

2. Select Your Hosting Plan
When you click on the Get Started Now button, you will be taken to the next page where you will be required to choose your hosting plan. In the shared hosting plan, these are the available plans you can select base on the type of websites you want to create and the features you need.
- Basic
- Plus
- Choice Plus
- Pro

If you are just starting and have a small budget, you can go for the basic plan.
But if you have money and expect more traffic to your site, then you can choose their Plus or Choice Plus plan which will give you access to great and unlimited features.
However, irrespective of the plan you choose to start with, you can freely upgrade later to any of the plans without any difficulties.
3. Enter Your Domain Name
This is a special step which if you make a mistake it can ruin your business. Give a name to your website. The name should correspond with your business name if you’re building a business website like yourbusinessname.com. But if is a personal website, then you can give it a name like yourname.com

For the extensions, you can choose .com, .org, .net etc. For showing professionalism, we recommend choosing .com. Select that and click on the next to go to the next step where we will enter our account details and complete the registration.
4. Fill In Your Account Details And Informations
Here, enter your personal information like your name, country, address, zip code, telephone number and email address. Some important details will be sent to your email after successful registration so make sure you enter a valid email address which you have access to.

5. Complete With Your Payment Details

The last field is your payment information. Enter the convenient payment method you would like to use for payment. You can click on more payment option to select more payment methods like PayPal. It’s up to you to decide which one is comfortable for you. After filling your payment details, Tick the terms and condition box and click on Submit.

Congrat! You’ve purchased your hosting and domain.
Please create you account username and Password

When everything is successful, Bluehost will send every details to your email address you used during the registration .
Read Also : How To Advertise Cheap On Quora
Step 2. Set Up Your Website
After buying the hosting and the domain, the next step is to set up your website and get it up and running. Therefore the next thing is to install WordPress because in the beginning it’s the CMS that we decided to use to build our website. So let’s start.
Installing WordPress
There are two ways to install WordPress.
- Automatic
- Manual
For this tutorial , we are going to use the automatic method which is just one-click-install. No hard process. Most web hosting companies has integrated the 1-click-installation for WordPress which make things very easy.
Follow the Below Steps To install WordPress.
- Sign in to your Hosting ( Bluehost ) Account.
- Go to your C-Panel.
- Search for “WordPress”
- Select the domain on which you want to install WordPress on.
- Click on “Install Now” and you will get access to your new website.

Step 3. Design Your Website
After installing WordPress and followed all the procedures, you will now have a newly basic website. Now this is just the default WordPress theme installed on your website. Now to start designing your website, we need to change this ugly theme and install our own theme.
Log In To Your Website
Now pay attention. We are going to log into our website back office. This is the link you will be using anytime you want to login into your back office of your website to design your site.
Go to https://yoursite.com/wp-admin [Replace “yoursite” with your domain name]
Once you log in, this will be your WordPress Dashboard where you can start editing your site.

Installing Themes
Theme in web development means design and appearance of your website. Theme change the appearance and design of your website. Is an important element to focus on when designing a website.
A good theme make your website look nice to your visitors. In this tutorial we are going to use the generatepress theme which is one of the fastest loading themes in the WordPress default themes.
Steps to install A theme.
- Hover your mouse to appearance
- Click on theme from the drop down menu.
- On the theme page, click on add new.
- On the search bar, search for generate press.
- Click on install and last click on activate.
Look at the picture below.

Set the Title And Tagline of your Website
Site titles briefly explain what your website is about in short word. And it tells search engine what your site is about which help in your site indexing on search engines.
Site Tagline are added at the end of the title across every page.
How to change the Title and Tagline
- Go to Settings
- Select General
- Fill in your title and tagline in the form below .

Basic Website Settings
Now we are going to do some little settings to beautify our website and make it strong.
Below are the following things we are going to set up.
- Permalink
- Profile
- Static Page And Home Page
Permalink
Permalinks are an important part of your website as both search engine and visitors use these URL to index and visit your site. A URL with a load of incomprehensible gibberish permalink will ruin your SEO and search engine indexing. Example of permalink is: https://softechreview.com/how-to-create-website
This is the best way to give the title of your blog post as far as permalink is concern.
How To Set Your Permalink
- Go to Settings
- Select Permalink
- Now on the permalink page, select Post Name as shown in the picture below.

Profile Set Up
On this page, you can edit your Profile Information like name, email, etc. here.
Steps To set It Up
- Hover over users
- Select Your Profile

Static Page ( Home Page ) Set Up
This is the place where you can specify which page should be your home page and your blog post page. For Home page tab, select Home based on the name you gave it when you were creating the page. Select Blog on the Posts Page Part.
How to set it up
- Hover over setting
- Select Reading

Read Also : All In One Email Marketing Software
How To Create A Page
Now our next step is to create some pages which we would want to have on our website. Examples pages we can create are Home page, Blog Page, Contact Us, About Us, Privacy Policy, Terms And Conditions,
Steps To create A Page
- Click on Page
- Click on Add New
- Give A title to your Page
- Click On Publish

That is it. Repeat the process and create the pages I have mentioned above.
How To Create Menu
After creating a page, we need to have them visible on our website. That is why we are going to create a menu and group these pages in the menu to make them visible on our website. Without creating a menu your pages will not be visible on your website.
Steps To create Menu
- Hover over appearance
- Select Menu
- Click on manage location and select the location of your menu.
- Give a Name to your Menu
- Select your pages you want to be on the menu from the left side box.
- Arrange them in order
- Click on Save Menu

Great. Your menu is created. All your pages will now be visible on your website.
How To Install A Plugin
Another great element you need on your website is Plugin. Is like the theme we discussed above.
What Is A Plugin ?
Plugin is a element or application that give more functionality to your website. Example like if you want to sell on your website, you need to install woocommerce plugin which will give that functionality to be able to sell on your website.
Important Plugins You Need To Get Going.
- Yoast SEO Or Rank Math
- Google Analytics
- Contact Form 7
Steps To Install A Plugin
- Click On Plugin
- Click on Add New
- On the search bar, type in the name of the plugin
- Click on install
- Click on Activate

Once you click on activate, your plugin will be activated and it will start working right away.
How To Create A Blog Posts Category
Now we are set up. Our last step is to create our first post. But before that we need to have a category for all of our post so that we can align our blog post to their various categories.
Steps To Create A Blog Posts Category
- Hover over Post and click on Categories
- Give a name to your category ( like Education )
- Click on the Add New Category Button

Well done! That’s how you can create a blog post category.
How To Create Your First Blog Post.
We have created our post category. Now we are set to create our first blog post. Let’s follow the steps below on how to create our first Blog post.
Steps To Create A Blog Post
- Click on Post from the dashboard
- Click on the Add New
- Give A Title to your Post ( example like ” How To Create A Website” )
- In the editor, you can start writing about the topic.You can see example from the picture below
- After you finish writing, Click on Publish.

Voila! You have published your first blog post. Now you can create more blog posts and publish. You have just finished creating your website and publish your first blog post.
Read Also : Clickfunnels Alternative
Conclusion
In a nutshell, this is how simple it is to create your first website. It is not difficult and not a rocket science. Just follow the steps above and you are good to go. There are more editing and designs that you need to give to your site to make it look nice.
We will cover those things in our upcoming tutorials. So please follow us and subscribe to our YouTube channel here for these tutorials. If you have any questions, don’t hesitate to contact us. For quick response, use our chatbot beside you to talk to us about anything bothering your mind. Thanks for reading my tutorial on How To create A Website.